
How To Transfer From CoinSpot To Metamask In 4 Steps
Last Updated on July 14, 2023 by Kevin GrovesSending digital currencies from one wallet to another can be a daunting prospect, particularly if you haven’t done it before. But on CoinSpot, it’s actually more simple than you might think.
In the tutorial below, we show you the steps you need to take to transfer cryptocurrencies from your CoinSpot wallet to the premium Metamask wallet. This guide has been informed by our first-hand experience sending Ethereum from our CoinSpot wallet to a newly created Metamask wallet.
How To Transfer Crypto From CoinSpot To Metamask
Here is an overview of the four steps involved to send digital currencies from CoinSpot to Metamask.
- Create a new Metamask wallet. Download the app onto your mobile device or add it as a Chrome extension on your browser. Follow the prompts to set up your password and Secret Recovery Phrase.
- Copy your unique Metamask wallet address. Click on the ‘copy’ icon at the top of the page or by scanning the QR using the CoinSpot mobile app.
- Log into your CoinSpot account. Log in and open the wallet of the asset that you intend to transfer. Select the blockchain network, enter the amount of crypto to send and the 2FA code, and paste in your Metamask wallet address as the recipient. Click on ‘Send’.
- Confirm transfer to Metamask. Review the details including the blockchain fees and confirm the transaction. The transferred crypto will appear as a ‘deposit’ in Metamask after approximately 15 minutes.
Affiliate Disclaimer: We are reader supported and may earn a commission when clicking through the product links. This helps us grow the content and support the website. Read our disclosure for more information.
Full Tutorial To Send Crypto From CoinSpot To Metamask
CoinSpot is one of the best Australian crypto exchanges to buy and store over 370 digital currencies. Withdrawing cryptocurrencies out of your CoinSpot wallet and sending them to a Metamask wallet is a simple process that a beginner can complete. Whilst being easy to do, there are a few things that you need to be aware of to ensure success. In this tutorial, you can find a detailed description of each of the steps you need to complete.
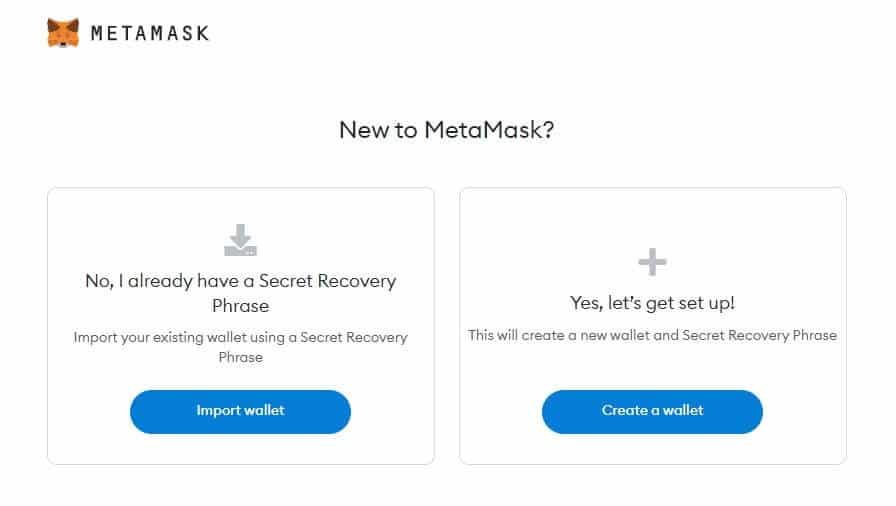
Step 1 – Create a Metamask account
Metamask is a premium multi-token wallet that allows you to retain 100% control of your digital assets. Creating a new Metamask wallet is about as easy as creating an account on a crypto exchange, minus the ID verification.
Metamask can be downloaded onto your iOS or Android mobile device. If you prefer using a desktop computer, then it can be installed as an extension to your Chrome, Edge, Brave, or Firefox browser.
You will need to follow the prompts by entering a password and setting up your Secret Recovery Phrase. The phrase consists of 12 randomly generated words that fit a particular order. Only you will know this information and it gives you full control over the contents of your wallet. This is a major benefit to using Metamask over a centralised crypto exchange that has access to the keys of your wallet.
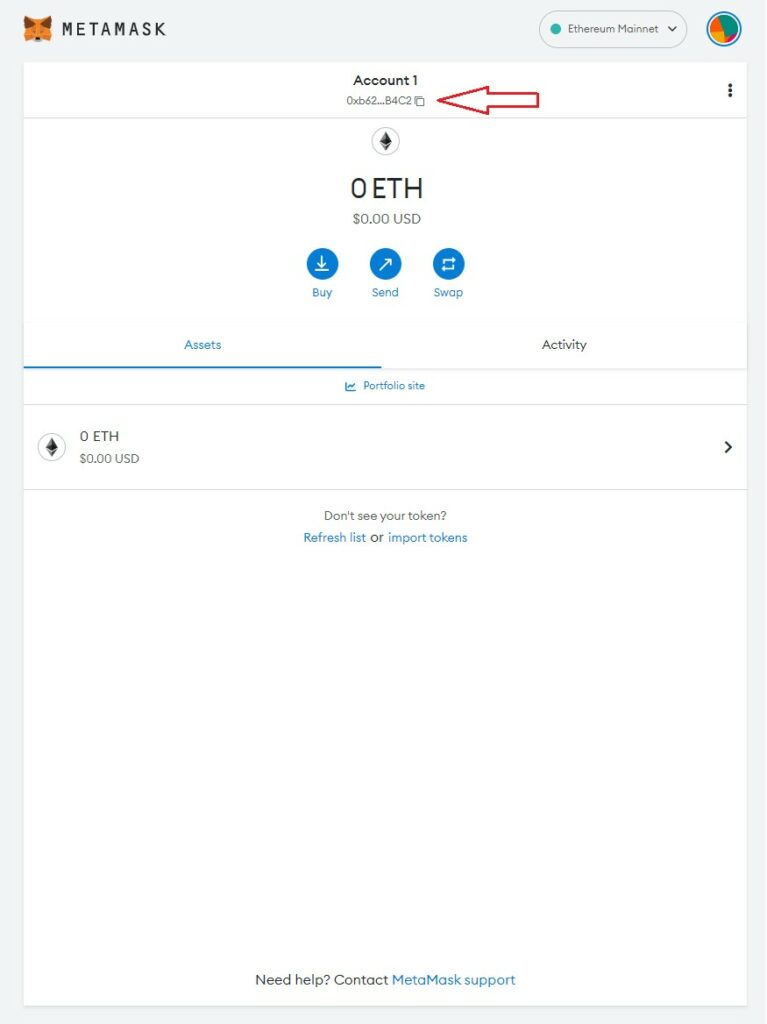
Step 2 – Open your Metamask wallet and copy your wallet address
Before you log into your CoinSpot account, copy your Metamask wallet address. Your wallet address is an alphanumeric code that can be found at the top of your Metamask account page (refer to the image below). You can copy it by clicking on the ‘copy’ icon or by using the CoinSpot mobile app to scan the QR code.
Step 3 – Log into your CoinSpot account and enter the withdrawal
To start the withdrawal process on CoinSpot, find the wallet that contains the crypto you want to send to Metamask. In this case, we wanted to transfer ETH so we navigated to our Ethereum wallet under the ‘Wallet’ tab.
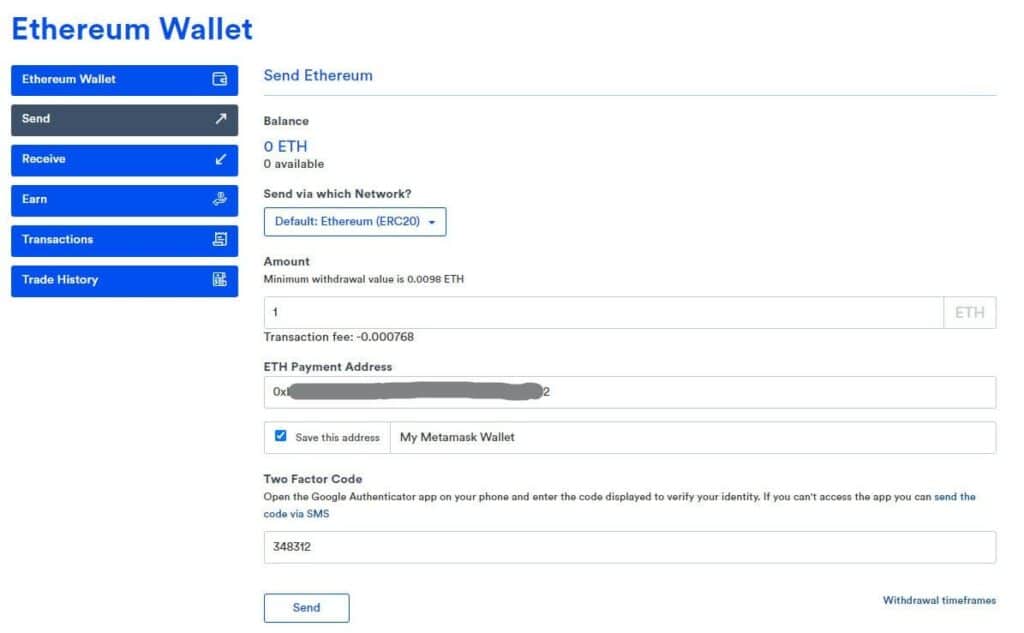
Once you open the wallet of the crypto you want to send, CoinSpot will present a page that resembles the image above. This is where you enter the details of the crypto transfer, specifically:
- The blockchain network facilitates the transaction.
- The amount of crypto to transfer to Metamask.
- Your Metamask wallet address should be copied in.
- The six-digit 2-Factor Authentication (2FA) code that will be derived from your mobile device.
Most of these items are self-explanatory, however, there are some things to note. You will need to select a blockchain network that Metamask supports, otherwise, the transaction will be unsuccessful and your assets will be lost. In this case, where ETH is being transferred, we know that Metamask supports the ERC-20 network. If in any doubt with other networks, you can test the transaction by sending a small amount of crypto first.
Your unique Metamask wallet address that you copied in Step 2 should be pasted into the blank field titled ‘ETH Payment Address’. Manually entering it will invite the potential for human error and your crypto will be lost if the address is incorrect.
Once all the correct details have been entered, click ‘Send’.
Step 4 – Review the withdrawal details and confirm
Clicking ‘Send’ will bring up a panel that summarised the details of the transaction including the fees. Whilst CoinSpot does not charge any fees to withdraw digital (or fiat) currencies, a minor blockchain fee will be incurred. This fee is unavoidable as it helps to facilitate the transaction on the network. The fee will be small and will vary depending on the asset that is being transferred as well as the level of network congestion.
Depending on the digital currency you send from CoinSpot to Metamask, the time taken to see the crypto in your wallet may vary. For example, Ethereum transfers typically take up to 15 minutes to process and Bitcoin may be as long as one hour if network congestion is high.
Once the transaction is complete, you will see the transferred assets in Metamask as a ‘deposit’.
Can You Send Crypto From CoinSpot To Metamask?
Yes, you can transfer digital currencies that you store on CoinSpot to a Metamask wallet. This can be achieved by pasting your Metamask wallet address into the CoinSpot withdrawal panel. Other items to complete include the selection of a blockchain network that is supported by Metamask, the amount of crypto to send, and your 2FA code.
What Are The Fees To Transfer From CoinSpot To Metamask?
Withdrawing cryptocurrencies from your CoinSpot wallet doesn’t incur any fees. A minor blockchain fee will apply, however, this is not paid to CoinSpot and is there to help facilitate the transaction on the network. The blockchain fee will vary depending on the digital asset being transferred as well as the level of congestion on the network. With higher network congestion comes a greater number of validations required, hence the higher fee.
How Fast Can It Take To Send Crypto From CoinSpot To Metamask?
Sending crypto from CoinSpot to Metamask will typically take between 5 and 60 minutes depending on the digital asset being transferred and the level of network congestion. Digital currencies such as Solana (SOL) and Cardano (ADA) are typically the fastest crypto to transfer, whilst Bitcoin transfers are known for their generally slower speeds. Related to the level of network congestion is the number of blockchain confirmations needed to validate the transaction.
The Advantages Of Sending Crypto From CoinSpot To Metamask
The benefits of Metamask go further than its reputation as a secure environment to store crypto. Here are some of the advantages of sending crypto to Metamask.
100% full custody of your assets
Since CoinSpot holds your digital currencies on your behalf within their cold and hot wallets, they have the keys to your account. In contrast, when you open a Metamask wallet, you alone have the password and private keys (Secret Recovery Phrase) for wallet access. This means you have full custody and control over your digital assets.
More functionality
Metamask is one of the best wallets to safely store crypto. On top of providing secure storage, the feature-rich app allows you to manage your crypto in ways that CoinSpot can’t. Metamask allows you to buy, store, send, and swap more digital assets and provides a gateway to other decentralised trading platforms such as UniSwap.
Frequently Asked Questions
Can you send Ethereum from CoinSpot to Metamask?
Yes, you can send Ethereum (ETH) from your CoinSpot wallet to a Metamask wallet. You will need to set up your Metamask wallet as the recipient of the ETH by pasting your unique wallet address into the ‘ETH Payment Address’ box found in your CoinSpot withdrawal panel. Select ERC-20 as the blockchain to ensure that it will be received in your Metamask wallet. No withdrawal fees will apply, however, a minor network fee will be incurred.
Are there any fees to send crypto from CoinSpot to Metamask?
There are no withdrawal fees from CoinSpot, however, a network or ‘gas’ fee will apply. This minor fee will vary depending on the digital asset being withdrawn as well as the level of congestion on the network. In terms of Metamask, there are no fees to receive the transferred crypto as a deposit.
Can I connect CoinSpot to Metamask?
Yes, you can connect your CoinSpot multi-token wallet to your Metamask wallet to facilitate transfers of digital currencies. To do this, you will need to copy and paste your Metamask wallet address into the ‘Payment Address’ of each token wallet on your CoinSpot account.
Conclusion
Transferring crypto such as Ethereum from CoinSpot to the Metamask wallet is a simple process. It involves creating a new Metamask wallet and copying your unique Metamask wallet address. In Coinspot, go to the withdrawal page and choose the crypto to transfer, select the blockchain network, enter the amount to send, and the 2FA code. Lastly, paste in your Metamask wallet address as the recipient. Click on ‘Send’.
Related reading:
Kevin is a cryptocurrency writer that has published hundreds of articles, guides, and reviews. He has been in the crypto space since 2016 and is passionate about sharing his expertise and knowledge with others.